gitから、一度、バージョン管理に入れてしまったファイル/ディレクトリを外す方法
$ git rm --cached [filename]
ディレクトリの場合は、
$ git rm -r --cached [dirname]
gitから、一度、バージョン管理に入れてしまったファイル/ディレクトリを外す方法
$ git rm --cached [filename]
ディレクトリの場合は、
$ git rm -r --cached [dirname]
 macOS Sierraにアップデートしたら、キーカスタマイズの「Karabiner」が動かなくなってしまった。US配列キーボードの左右の⌘(command)キーを英数・かなの切替に使っていたので、大変困る。
代替のソフトを探すとこちらを発見。その名も、「⌘英かな」。インストールすると、⌘(command)キーの動作をカスタマイズできる。
MacにBrew経由でインストールしたBongoDBが起動しなくなったときの対応。PIDファイルが残っているのが主な原因らしい。
エラーは以下の通り
$ mongo

MongoDB shell version: 3.2.1

connecting to: test

2016-02-03T04:53:08.268+0900 W NETWORK  [thread1] Failed to connect to 127.0.0.1:27017, reason: errno:61 Connection refused

2016-02-03T04:53:08.270+0900 E QUERY    [thread1] Error: couldn't connect to server 127.0.0.1:27017, connection attempt failed :

connect@src/mongo/shell/mongo.js:224:14

@(connect):1:6
exception: connect failed
mongodにオプションを付けて起動する。brew経由の場合は、--dbpathは以下の様な形
$ sudo mongod --dbpath=/usr/local/var/mongodb/ --repair
$ sudo brew install mongodb
Error: You must `brew link go scons` before mongodb can be installed
と怒られたので、
$ sudo brew link go scons
$ sudo brew install mongodb
インストール完了。
インストール後のメッセージでこの様に出てくるので、
==> Caveats
To have launchd start mongodb at login:
  ln -sfv /usr/local/opt/mongodb/*.plist ~/Library/LaunchAgents
Then to load mongodb now:
  launchctl load ~/Library/LaunchAgents/homebrew.mxcl.mongodb.plist
Or, if you don't want/need launchctl, you can just run:
  mongod --config /usr/local/etc/mongod.conf
以下を実行。
$ sudo ln -sfv /usr/local/opt/mongodb/*.plist ~/Library/LaunchAgents
/Users/ken/Library/LaunchAgents/homebrew.mxcl.mongodb.plist -> /usr/local/opt/mongodb/homebrew.mxcl.mongodb.plist
$ sudo launchctl load ~/Library/LaunchAgents/homebrew.mxcl.mongodb.plist
自動起動スクリプトが登録される。
brew updateでエラーが発生する場合の対処方法
$ brew update
(中略)
Aborting
Error: Failure while executing: git pull -q origin refs/heads/master:refs/remotes/origin/master
brew自体を最新のファイルに入れ替える
cd $(brew --prefix)
$ pwd
/usr/local
$ sudo git fetch origin
$ sudo git reset --hard origin/master
$ sudo brew update
via! http://qiita.com/harapeko_wktk/items/f4f44ddb5d3912e15ea2
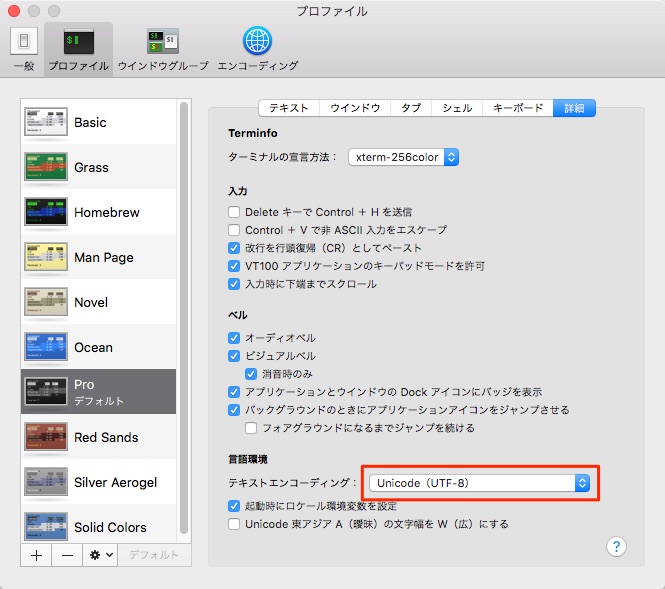
USキーボードを入れ替えた時からなのか、何かのアップデートの時からなのか、“~”がTerminalで入力できなくなった。原因は、言語設定らしい。
言語環境のテキストエンコーディング(赤枠)の部分のが、SJISなどになっていたら、Unicodeに変更する。
vagrantがエラーを吐いて立ち上がらなくなった。症状はこちら。
$ vagrant up
/opt/vagrant/embedded/gems/gems/vagrant-1.7.4/lib/vagrant/util/platform.rb:127:in `downcase': invalid byte sequence in Windows-31J (ArgumentError)
	from /opt/vagrant/embedded/gems/gems/vagrant-1.7.4/lib/vagrant/util/platform.rb:127:in `block (2 levels) in fs_real_path'
	from /opt/vagrant/embedded/gems/gems/vagrant-1.7.4/lib/vagrant/util/platform.rb:126:in `each'
	from /opt/vagrant/embedded/gems/gems/vagrant-1.7.4/lib/vagrant/util/platform.rb:126:in `block in fs_real_path'
	from /opt/vagrant/embedded/gems/gems/vagrant-1.7.4/lib/vagrant/util/platform.rb:125:in `each'
	from /opt/vagrant/embedded/gems/gems/vagrant-1.7.4/lib/vagrant/util/platform.rb:125:in `fs_real_path'
	from /opt/vagrant/embedded/gems/gems/vagrant-1.7.4/lib/vagrant/environment.rb:120:in `initialize'
	from /opt/vagrant/embedded/gems/gems/vagrant-1.7.4/bin/vagrant:165:in `new'
	from /opt/vagrant/embedded/gems/gems/vagrant-1.7.4/bin/vagrant:165:in `<main>'
ググると、こういう解決策が。
export LANG=ja_JP.UTF-8
via! http://www.eelingshi.com/questions/2864996/vagrant-up-fails-and-error-is-invalid-byte-sequence-in-windows-31j-argument
chromeのアドレス入力で、
chrome://flags/
と入れると、設定画面が現れ、ここで試験運用機能を有効化できる。
git push origin new_branch
git remote -v