vcgencmd
$ vcgencmd display_power {0|1}0: OFF
1: ON
$ vcgencmd display_power {0|1}0: OFF
1: ON
RasPiのGPUを有効にする方法。
インストール初期状態のRasPiはGPUが有効になっていないため、ブラウザベースでも10FPSぐらいしか出ない。
RasPiの設定画面を開く
$ sudo raspi-config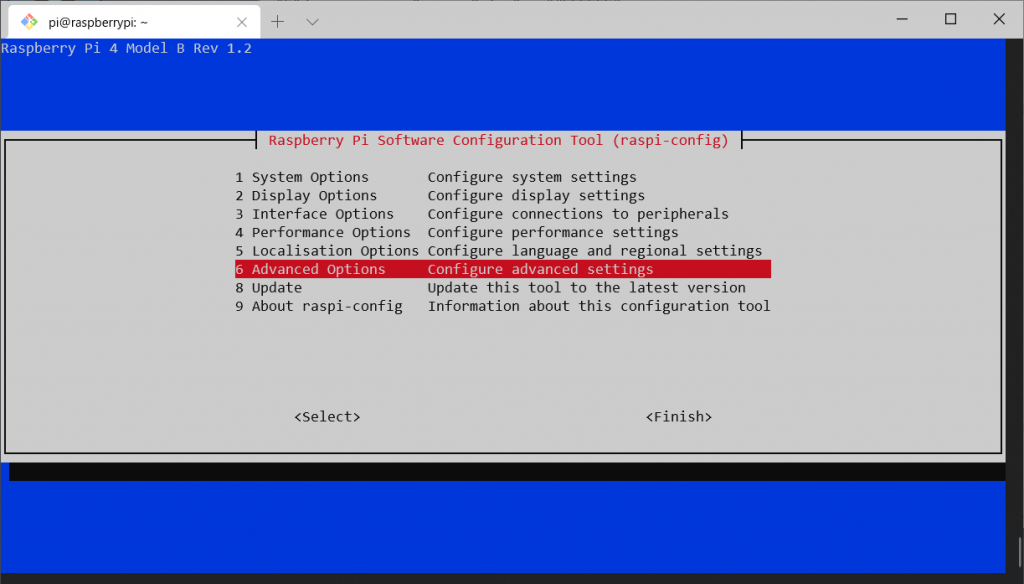
”6 Advanced Options”を選択
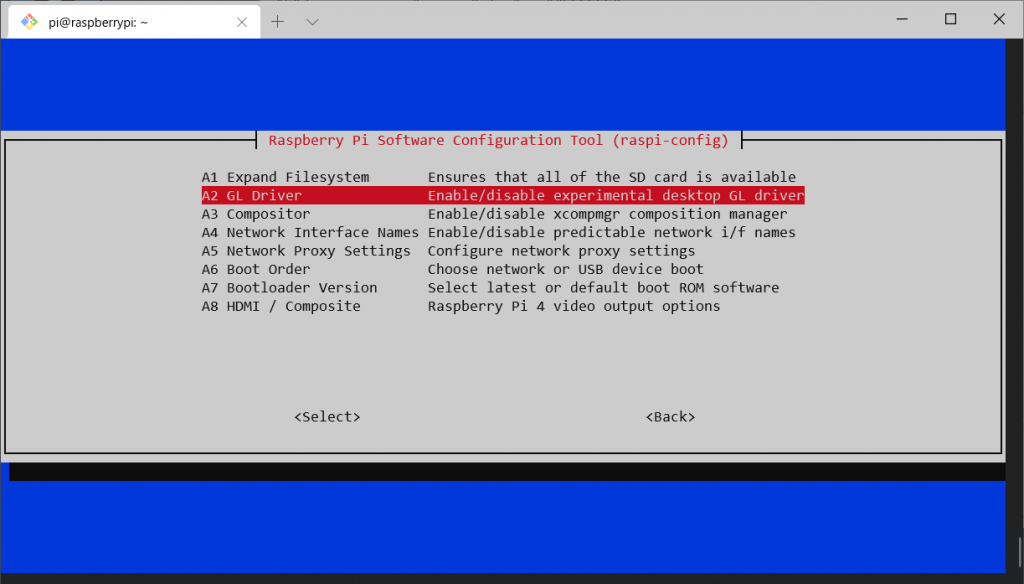
“A2 GL Driver”を選択
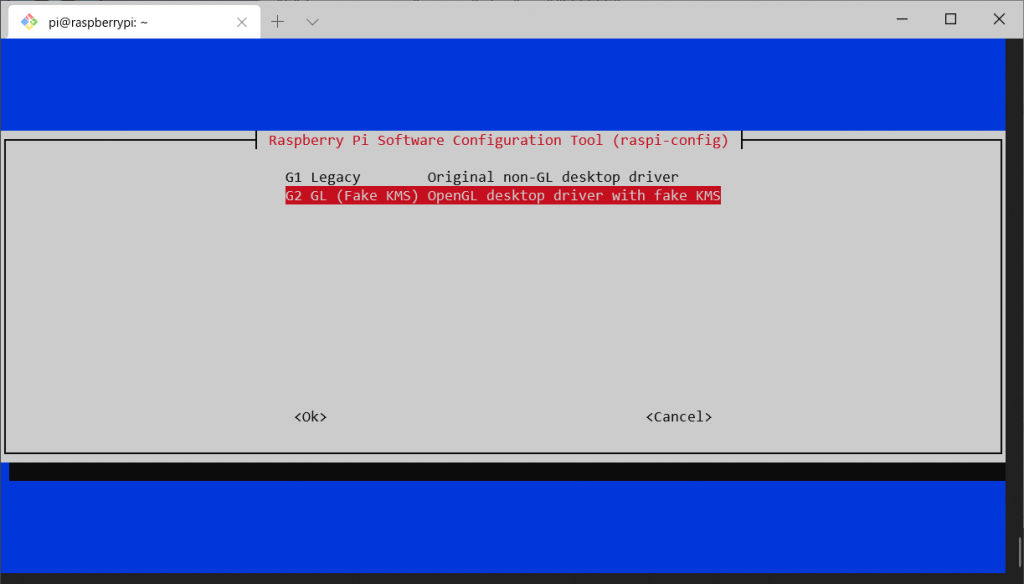
デフォルトでは、Legacyが選択されているので、G2 GL (Fake KMS) OpenGL desktop driver with fake KMSを選択。
GPUが有効になって、アクセレーションが有効になっているかは、Chromiumから確認できる。以下のURLを開くと、設定状況が表示される
chrome://gpu/Windows環境にて、nodistでnode.jsを管理している際に、npmのインストールが失敗してエラーが出るときの対処方法
$ nodist npm 6.14.10
npm 6.14.10

$ npm -v
internal/modules/cjs/loader.js:883
  throw err;
  ^

Error: Cannot find module 'C:\Program Files (x86)\Nodist\npmv\6.14.10\bin\npm-cli.js'
    at Function.Module._resolveFilename (internal/modules/cjs/loader.js:880:15    5)
    at Function.Module._load (internal/modules/cjs/loader.js:725:27)
    at Function.executeUserEntryPoint [as runMain] (internal/modules/run_main.    .js:72:12)
    at internal/main/run_main_module.js:17:47 {
  code: 'MODULE_NOT_FOUND',
  requireStack: []
}ダウンロード&インストールに失敗しているようなので、nodistのnpmの展開先を削除する。
各バージョンのnpmのインストール先は、こちらC:\Program Files (x86)\Nodist\npmv
エラーが出ていて、インストールしたいバージョンを削除する。
再度、npmをnodist経由でインストールする
$ nodist npm 6.14.10もしくは、
$ nodist npm match正常にインストールされていると、
$ npm -v
6.14.10git clone -b branch_name https://repository_address directory_nameVer.3.xと最新のVer.6.xで違いがあったのでメモ
const now = new Date();
const midnight = d3.utcDay.floor(now);const now = new Date();
const midnight = d3.time.day.utc.floor(now);APIの使用が変わったらしく、最新バージョンでは、d3.time.*は使えない
$ npm install -D pixi.js
$ npm install -D @types/pixi.js$ npm install terser-webpack-plugin --save-devライブラリの読み込み
const TerserPlugin = require('terser-webpack-plugin');プラグインの読み込み
module.exports = {
//module.exports = ( env, argv ) => ({
  optimization: {
    minimize: true,
    minimizer: [new TerserPlugin()],
  },
};$ npm install -D @vimeo/player<template>
<iframe
src="https://player.vimeo.com/video/vimeoid"
width="640"
height="360"
frameborder="0"
allowfullscreen
></iframe>
</template>※vimeid部分は任意で指定
<script>
import Player from "@vimeo/player";

export default {
    mounted: function() {
        var iframe = document.querySelector("iframe");
        var player = new Player(iframe);

        player.on("play", function() {
            console.log("Played the video");
        });

        player.on("ended", function() {
            console.log("Ended the video");
        });

        player.getVideoTitle().then(function(title) {
            console.log("title:", title);
        });
    }
};
</script>
モジュールのインポート
import Player from "@vimeo/player";Vimeoプレイヤーへのアクセス<iframe>タグからSDK経由でプレイヤーを取得する
var iframe = document.querySelector("iframe");
var player = new Player(iframe);
イベントの設定とメソッド実行
player.on("play", function() {
    console.log("Played the video");
});

player.on("ended", function() {
    console.log("Ended the video");
});

player.getVideoTitle().then(function(title) {
    console.log("title:", title);
});.vueファイル内で
methods: {
    signOut() {
        firebase
            .auth()
            .signOut()
            .then(() => {
                this.$router.push("/login");
                this.$store.commit("/user/setIsLogin", false);
            });
    },
},firebase.auth().signOut()でサインアウトできる。
上の例では、処理後、
にしている。
<template v-slot:item.actions="{ item }">
    <v-btn :to="`desserts/${item.id}`" nuxt icon>
        <v-icon small>mdi-pencil</v-icon>
    </v-btn>
</template>:to<v-btn>に、Vue Routerのリンクをつくるには、:toスロットを使う
上の例では、/dessets/_id.vueへのリンクを生成している。(_idの部分は、${item.id}が自動的に置換される)
nuxt
nuxt-linkを有効にする
icon
icon表示型のボタンを生成する