Java Script」カテゴリーアーカイブ

Vueで、Vimeoのプレイヤーを埋め込む方法

Vimeoプレイヤーのインストール

$ npm install -D @vimeo/player

.vueファイル

<template>
    <iframe
        src="https://player.vimeo.com/video/vimeoid"
        width="640"
        height="360"
        frameborder="0"
        allowfullscreen
    ></iframe>
</template>

vimeid部分は任意で指定

<script>
import Player from "@vimeo/player";

export default {
    mounted: function() {
        var iframe = document.querySelector("iframe");
        var player = new Player(iframe);

        player.on("play", function() {
            console.log("Played the video");
        });

        player.on("ended", function() {
            console.log("Ended the video");
        });

        player.getVideoTitle().then(function(title) {
            console.log("title:", title);
        });
    }
};
</script>

モジュールのインポート

import Player from "@vimeo/player";

Vimeoプレイヤーへのアクセス
<iframe>タグからSDK経由でプレイヤーを取得する

var iframe = document.querySelector("iframe");
var player = new Player(iframe);

イベントの設定とメソッド実行

player.on("play", function() {
    console.log("Played the video");
});

player.on("ended", function() {
    console.log("Ended the video");
});

player.getVideoTitle().then(function(title) {
    console.log("title:", title);
});

Nuxt.jsでFirebaseからサインアウトさせる方法

.vueファイル内で

methods: {
    signOut() {
        firebase
            .auth()
            .signOut()
            .then(() => {
                this.$router.push("/login");
                this.$store.commit("/user/setIsLogin", false);
            });
    },
},

firebase.auth().signOut()でサインアウトできる。
上の例では、処理後、

  • サインイン(ログイン)ページに自動遷移
  • Vuexのサインインフラグをfalse

にしている。

Vuetifyのボタンにnuxt-linkをつくる

HTML

<template v-slot:item.actions="{ item }">
    <v-btn :to="`desserts/${item.id}`" nuxt icon>
        <v-icon small>mdi-pencil</v-icon>
    </v-btn>
</template>

解説

:to
<v-btn>に、Vue Routerのリンクをつくるには、:toスロットを使う
上の例では、/dessets/_id.vueへのリンクを生成している。(_idの部分は、${item.id}が自動的に置換される)

nuxt
nuxt-linkを有効にする

icon
icon表示型のボタンを生成する

VuetifyのDataTableの列幅を指定する

DataTableの列幅は、slotで流し込むheadersの中で指定できる。

HTML

<v-data-table :headers="headers" :items="itemlist">

JavaScript

data() {
    return {
        headers: [
            { text: "ColA", value: "cola", width: "10%" },
            { text: "ColB", value: "colb", width: "80%" },
            { text: "ColC", value: "cols", width: "10%" },
        ],
    }
}

ここでは、%で指定しているが、ピクセルでも指定できるらしい。レスポンシブを考えると、%の方が良いかもしれない。

Via! https://sugimotonote.com/2019/03/12/post-1336/

Nuxt.jsでGoogle Analyticsを使う方法

@nuxtjs/google-analytics
https://www.npmjs.com/package/@nuxtjs/google-analytics
というモジュールを使う

google-analyticsのインストール

yarn add --dev @nuxtjs/google-analytics

nuxt.config.jsの設定

以下、追加

export default {
  build: {
    buildModules: ["@nuxtjs/google-analytics"],
    googleAnalytics: {
      id: "UA-12301-2"
    }
  }
}

idは、各自のものに書き換える。

Nuxt.JSで開発・本番の環境変数を切り替える方法(Vercel編)

Nuxt.JSのSPAなコンテンツをVercelで公開するのを前提に、環境変数を設定する方法。callbackのURLを開発環境とProduction(本番)環境で自動的に切り替えるのに便利。

例えば、callbackされるURLを以下のように切り替える場合など

#開発環境
http://localhost:8080/callback
#本番環境
http://foobar.app/callback

dotenvのインストール

開発環境と本番環境で切り替えたい内容は、dotenvというライブラリで管理する。yarnでインストール(npmでもOK)

$ yarn add --dev @nuxtjs/dotenv

dotenvの設定(開発環境)

プロジェクトのルートディレクトリに、.envファイルを作り、開発環境時の環境変数を指定する。本番環境用の値は、後ほど、Vercelの設定画面で設定する。

REDIRECT_URI="http://localhost:8080/callback"

.envファイルを複数作り、環境によって切り替える方法もあるが、Nuxt.jsの公式では、単一の.envファイルの使用を推奨。

.gitignoreに追加

.envで設定した値は、セキュリティー上、公開されない方が良い場合も考えられるので、git管理下には置かない。

#以下、追加
.env

nuxt.config.jsの設定

以下、追加

require("dotenv").config();
const { REDIRECT_URI } = process.env; #使用する環境変数名

#以下は、export default 内に
export default {
  buildModules: ["@nuxtjs/dotenv"],
  env: {
    REDIRECT_URI #使用する環境変数名
  }
}

.vueファイルからの参照

export default {
  data() {
    return {
      redirectURI: process.env.REDIRECT_URI
    };
  }
}

Vercel(本番環境)の設定

Vercelでは、環境変数の値を設定し、build時に自動的に埋め込める機能がある。これを使って、本番環境の値を入れ込む。

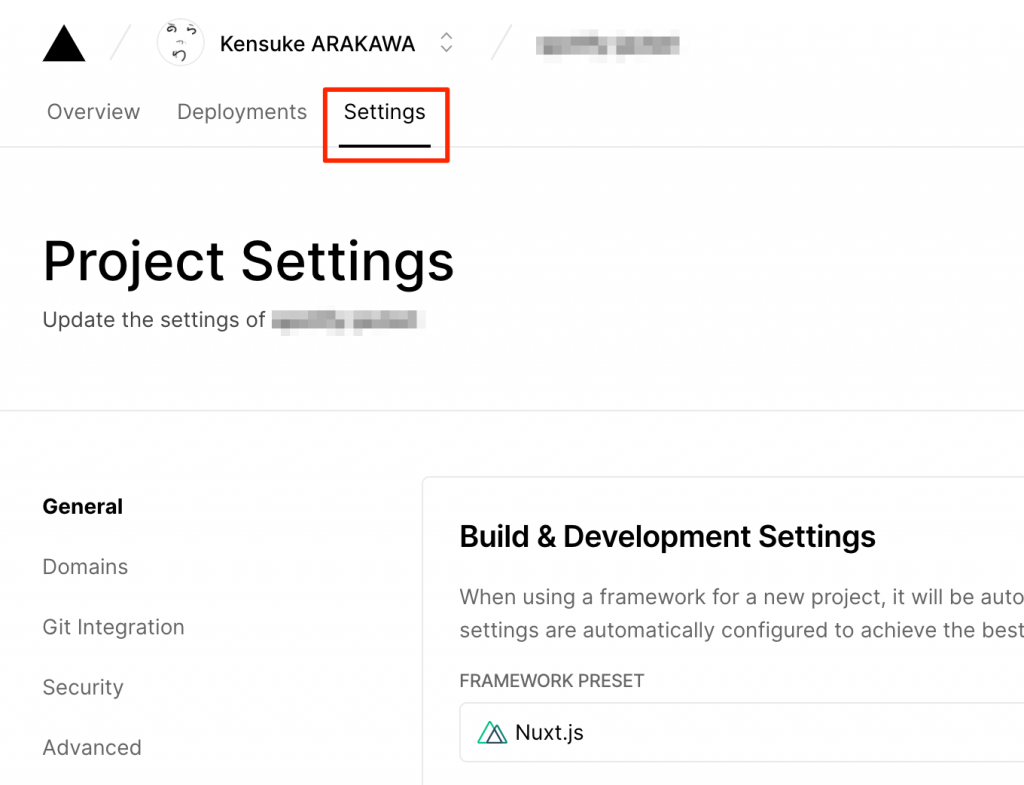
設定したいプロジェクトの「Settings」を選ぶ。

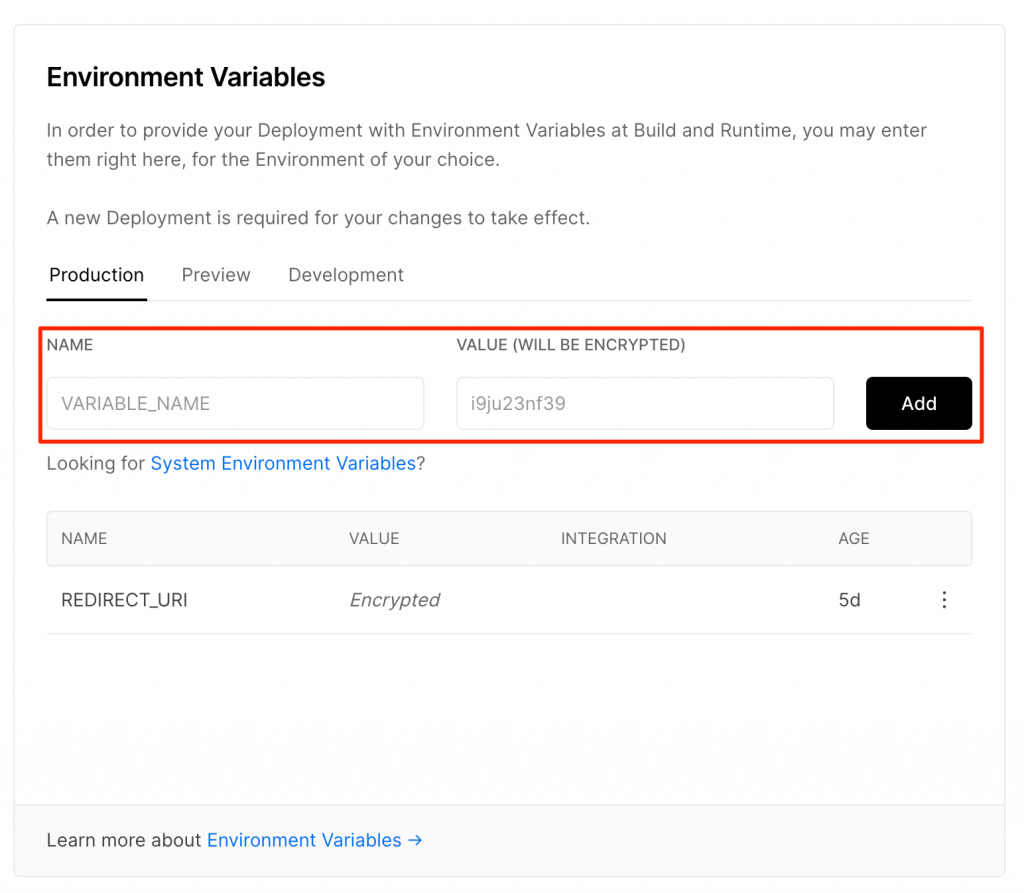
画面後半にあるEnvironment Variablesで、環境変数名と値を登録する。なお、登録された値は暗号化されるので、表示&確認することはできないので注意。

次回ビルドされたときに、登録した値に置換される。

参考

https://crieit.net/posts/VercelZeit-Now-Nuxt-js-2020

https://qiita.com/taichi0514/items/3939af222dee21a44413https://blog.ikedaosushi.com/entry/2019/04/17/220317

https://qiita.com/yfujii1127/items/c77bff6f0177b4ff219e

Webpackで静的なファイルをコピーする方法

CopyWebpackPluginを使って、build時に、JSONファイルなどをバンドルせずに、単体でコピーする方法。

インストール方法

$ npm i -S copy-webpack-plugin write-file-webpack-plugin

file-webpack-pluginを入れることで、debug時に、実際のdistディレクトリにも書き出されるようになります。

webpack.config.js

importを追加

const CopyFilePlugin = require("copy-webpack-plugin");
const WriteFilePlugin = require("write-file-webpack-plugin");

pluginの項目に追加

new CopyFilePlugin(
    [
        {
            context: "src",
            from: "**/*.json",
            to: path.resolve(__dirname, "dist")
        }
    ],
    { copyUnmodified: true }
),
new WriteFilePlugin()

src以下のJSONファイルをdist以下にコピーするという設定。contextで、対象となるディレクトリ/ファイルの親ディレクトリを指定。

参考にしたサイト

https://qiita.com/pepoipod/items/e41105e8f3afd47dc01c
https://codeday.me/jp/qa/20190515/828253.html

TypeScriptでlog4jsを使う方法

インストール

$ npm i -S log4js @types/log4js

使い方

コンソールとファイルに、ログを同時出力。

import { configure, getLogger } from "log4js";

configure({
  appenders: {
    console: {
      type: "console"
    },
    logfile: { type: "file", filename: "log/app.log" }
  },
  categories: { default: { appenders: ["console", "logfile"], level: "error" } }
});

const logger = getLogger();

logger.level = "debug";
logger.debug("Some debug messages");
logger.error("aha!");

出力結果

[2019-10-20T10:58:43.835] [DEBUG] default - Some debug messages
[2019-10-20T10:58:43.839] [ERROR] default - aha!

設定を変えると、ログレベルごとに出力先を変えたり、ログの出力のテンプレート(レイアウト)を変更できたりする。

log4jsのドキュメント
https://log4js-node.github.io/log4js-node/

日付の形式について
https://www.npmjs.com/package/date-format

TypeScript + node.js + VisualStudioCodeの開発環境

node.jsでアプリケーションをつくるのに、TypeScriptで書いて、Visual Studio Codeを開発環境とする方法を探る

参考になったサイト

https://qiita.com/notakaos/items/3bbd2293e2ff286d9f49
https://qiita.com/kurogelee/items/cf7954f6c23294600ef2
https://github.com/TypeStrong/ts-node/issues/46#issuecomment-437758378

ここのボイラープレートをテンプレートにすると便利です。必要なnpmパッケージ、設定ファイルがはいっています。git cloneなどでローカルに。
https://github.com/notakaos/typescript-node-base

package.json

{
  "name": "typescript-node-base",
  "keywords": [],

  "version": "0.1.0",
  "main": "dist/index.js",
  "scripts": {
    "dev": "ts-node ./src/index.ts",
    "dev:watch": "ts-node-dev --respawn src/index.ts",
    "clean": "rimraf dist/*",
    "tsc": "tsc",
    "build": "npm-run-all clean tsc",
    "start": "node ."
  },
  "keywords": [],
  "author": "YOUR NAME",
  "license": "ISC",
  "description": "",
  "dependencies": {},
  "devDependencies": {
    "@types/node": "^12.7.4",
    "npm-run-all": "^4.1.5",
    "rimraf": "^2.7.1",
    "ts-node": "^8.3.0",
    "ts-node-dev": "^1.0.0-pre.42",
    "typescript": "^3.6.2"
  }
}

L9: --respawnを指定することで、サーバ型ではないスクリプトでも、実行後終了せずに待機させ、更新→再読み込み→再起動が可能に。

tsconfig.json

{
  "compilerOptions": {
    "target": "ES2019",
    "module": "commonjs",
    "sourceMap": true,
    "outDir": "./dist",
    "strict": true,
    "noImplicitAny": true,
    "esModuleInterop": true
  },
  "include": ["src/**/*"]
}

sourceMapは有効にしましょう。Debugが効くようになります。

launch.json

{
  "version": "0.2.0",
  "configurations": [
    {
      "name": "ts-node[debug]",
      "type": "node",
      "request": "launch",
      "args": ["${workspaceFolder}/src/index.ts"],
      "runtimeArgs": ["--nolazy", "-r", "ts-node/register"],
      "sourceMaps": true,
      "cwd": "${workspaceRoot}",
      "restart": true,
      "protocol": "inspector"
    }
  ]
}

L8: 任意のファイルを指定

https://github.com/TypeStrong/ts-node/issues/46#issuecomment-437758378
の投稿が参考になりました。